Manage COS Servers
In the CADMATIC desktop, Object > Manage COS Servers opens the Manage COS Servers dialog where you can manage your COS networks and COS servers.
Note: This tool includes features that the original Object > Manage COS tool did not have, such as being able to set a replica server offline via its master server, and scheduling backups for multiple servers.
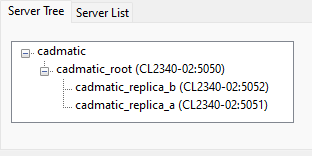
Server Tree tab
In the Manage COS Servers dialog, the Server Tree tab displays a hierarchical tree of known COS networks. Each network includes exactly one root COS server, which is usually accompanied by one or more subordinate COS servers. In the context of replication, a server with its own subordinates is referred to as a 'master server', and its direct subordinates are called 'replica servers'.
If a specific server is not listed, it can be added as described in Add or remove servers.
Selecting a COS network or COS server from the tree will attempt to connect to COS. For a successful connection, the Manage COS Servers tool and the target COS server must be of the same main version.
- Selecting a COS network shows the Network settings.
- Selecting a COS server shows the Server control settings.
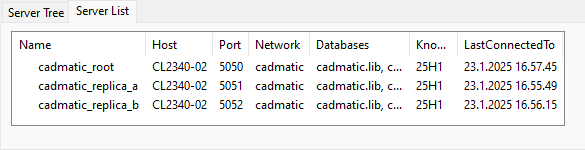
Server List tab
In the Manage COS Servers dialog, the Server List tab lists the known root and replica COS servers in the format <networkName>_<serverName>.
If a specific server is not listed, it can be added as described in Add or remove servers.
Selecting a COS server from the list will attempt to connect to COS. For a successful connection, the Manage COS Servers tool and the target COS server must be of the same main version.
-
Selecting a COS server shows the Server control settings.
-
Selecting two or more COS servers at once shows the Multi server control settings.
You can right-click a server in the server list to show or hide columns, except Name is always shown.
|
Column |
Description |
|---|---|
|
Name |
The name of the COS server. |
|
Host |
The name of the host computer. |
|
Port |
The TCP/IP port of the COS server. |
|
Network |
The name of the COS network. This is also known as the Schema name. |
|
Databases |
The names of the library and project databases in the COS server. |
|
KnownVersion |
The release version. |
|
LastConnectedTo |
The date and time when the server was last connected to. |
Add or remove servers
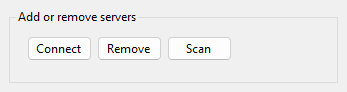
In the lower-left corner of the Manage COS Servers dialog, in the Add or remove servers section, you can connect and disconnect COS servers. Once a server is connected, it can be managed via the Server Tree tab and Server List tab.
When you establish a connection to a COS server using either a Windows or COS account, the connection information is saved in a local credential manager, influencing your future log-ins. If you wish to change your login method for a particular server, you will need to remove the existing connection and then reconnect using different credentials.
|
Control |
Description |
|---|---|
|
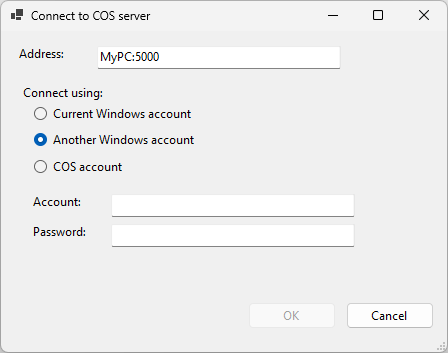
Opens the Connect to COS server dialog for connecting to a COS server.
Important: Establishing a connection with a COS user account is a crucial step for those intending to run design applications specifically with their COS user account, rather than their Windows account. |
|
|
Disconnects your environment from the selected COS servers. This is a necessary step if you wish to reconnect to a server with different credentials. Alternatively, you can use this function to hide a server that you do not need to interact with. Note: If the removed server is the only server in the given COS network, hiding the server will also hide the COS network. |
|
|
Scans the selected COS server for any replica servers that are not listed in the management tool. Only a connected server can be scanned. |
Network settings
On the Server Tree tab, select a COS network to display the following settings.
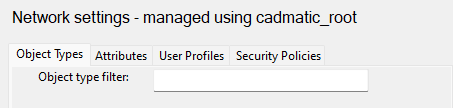
Object Types | Attributes | User Profiles | Security Policies | Content Categories
Object Types
On the Network settings pane, select the Object Types tab to manage the attribute assignments and security settings of object types in the selected COS network. The list can be filtered by entering a text string into the Object type filter field.
Object types generally fall into three categories:
- Object types that manage design data, such as 'Model Object' or 'Drawing'. These provide COS objects that users can access via an object browser instance (like documents) or a custom user interface.
- Object types that manage reference data, such as 'Catalog Part' or 'Sheet'. Usually, these are stored in the library database, but they can also be created in projects. These objects can be managed through the Desktop application (Object menu > Library and Project Databases).
- Object types that represent internal structures, such as 'Import History'. These objects have little significance to users as they are never accessed directly and cannot be seen via any object browser interface. Occasionally, it may be necessary to change their Security settings.
The set of available COS object types is fixed—user organizations cannot create new object types.
Object types may display the following details:
-
Recoverable – Object types can be recoverable or non-recoverable, which determines what happens when an object is deleted.
-
Deleting a recoverable COS object moves the object to the Trash bin in the COS object browser. These so-called ghost objects retain all their original information and can be fully restored to the library or project database using the Restore Deleted Object command in the trash bin.
-
Deleting a non-recoverable COS object is immediate and permanent. The object is removed from the database, leaving only a tombstone that contains basic information about the deleted object.
-
-
No refs allowed – COS objects with this property cannot refer to other COS objects. Referenced objects cannot be deleted until the reference is removed.
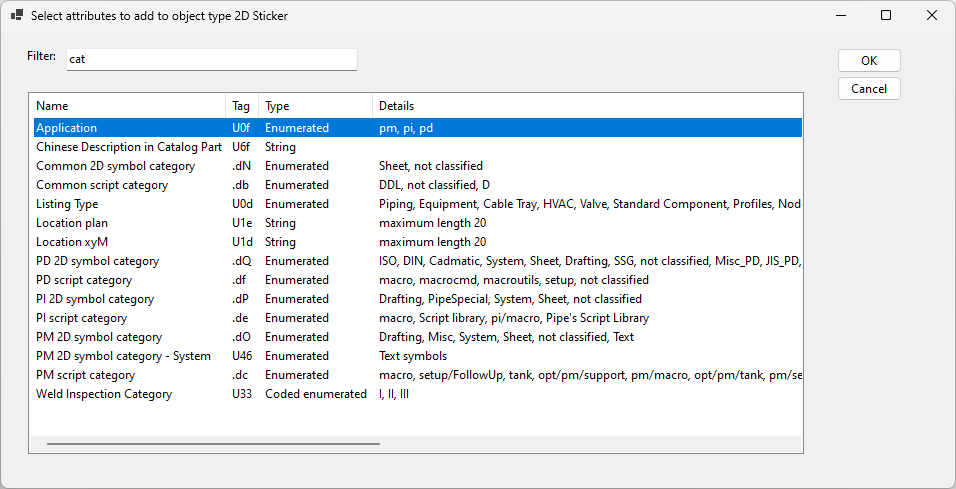
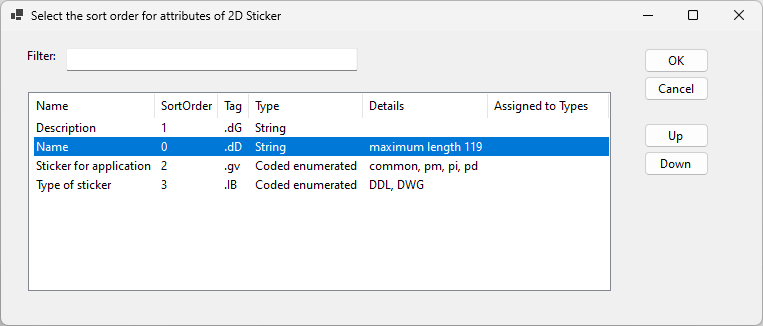
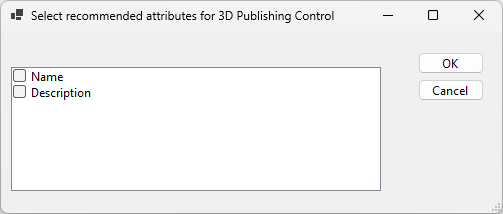
You can expand an object type in the list to see its attributes.
You can select an object type to manage it using the following commands.
|
Control |
Description |
|---|---|
|
Opens the Select attributes to add to object type… dialog for assigning COS attributes defined on the Attributes tab to the selected object type. |
|
|
Unassigns the selected attribute from the object type. You cannot unassign hard-wired attributes essential to the application. |
|
|
Opens the Select the sort order for attributes of… dialog for adjusting the order in which the attributes are presented. Select an attribute and click Up or Down to change its SortOrder value; the smaller the value, the higher the attribute is in user interfaces that list the attributes. |
|
|
Opens the Select recommended attributes for… dialog for specifying which attributes are included by default in new objects of this type. |
|
|
Opens the Object Type Access Rights dialog for selecting which User Profiles are allowed to Create, Modify, and Remove objects of this type. Certain application functions require that also users can write to certain project objects. Otherwise, there is no great risk in limiting the access rights—you can easily restore the original rights if needed. For example, limiting the access rights of library objects such as GDLs will not affect the functionality of the program, it will only affect the users who can no longer modify those objects. Note: You cannot restrict access to specific object subtypes, such as model objects that represent air ducts. |

Attributes
On the Network settings pane, select the Attributes tab to manage attributes that are stored in COS. The list can be filtered by entering a text string in the Filter field.
Attributes provide a flexible mechanism for attaching additional information to COS objects.
There are a number of predefined attributes, and you can also create new ones. Attributes can be assigned to object types on the Object Types tab. An attribute's configuration specifies whether the attribute can be assigned to multiple object types or to only one object type at a time.
You can manage attributes with the following commands.
|
Control |
Description |
|---|---|
|
Opens the Attribute Properties dialog for creating a new COS attribute. Note: Upgrading to a new software version will automatically rename any user-defined attributes that share the same name with a default attribute in the new COS schema. The renaming process appends the tag of the user-defined attribute in parentheses after the attribute's name, for example: 'Gasket material (gMA)'. |
|
|
Opens the Attribute Properties dialog for editing the properties of the selected attribute. |
|
|
Opens the Attribute Properties dialog for viewing the properties of the selected hard-wired attribute. You cannot edit hard-wired attributes essential to the application. |
|
|
Deletes the selected attribute, without prompting you to confirm the action. You cannot delete attributes that are currently assigned to Object Types or hard-wired attributes essential to the application. |
Attribute Properties
Starting to create, edit, or view a COS attribute opens the Attribute Properties dialog. If viewing a hard-wired attribute, none of the properties can be edited.
Attributes have common properties and properties specific to the attribute type.
|
Property |
Description |
|---|---|
|
The name of the attribute. Names can consist of 1-99 characters. |
|
|
Abbreviation that identifies the attribute. Abbreviations can consist of 1–3 characters, which can include letters (a-z, A-Z), numerals (0-9), and some special characters. |
|
|
The type of the attribute: |
|
|
Select this option to specify that the attribute can only be assigned to a single COS object type at a time. This option cannot be selected if the attribute is already assigned to more than one COS object type. Clicking Show Conflicting Types lists those object types. |
String
Attributes whose type is 'string' can store a plain-text value of a given length; it is the most versatile attribute type.
|
Control |
Description |
|---|---|
|
Maximum length |
The maximum length of the string value. If not defined, the maximum is 80 characters. |
Integer
Attributes whose type is 'integer' can store a numeric value without decimals. Optionally, the attribute can limit the range of acceptable values.
|
Control |
Description |
|---|---|
|
Minimum value |
The minimum attribute value. |
|
Maximum value |
The maximum attribute value. |
Time
Attributes whose type is 'time' can store a date/time value. Optionally, the attribute type can specify the earliest possible time.
This attribute type is not supported in all user interfaces.
|
Control |
Description |
|---|---|
|
Minimum value |
The minimum attribute value in the format d.m.yyyy hh.mm.ss. |
Enumerated
Attributes whose type is 'enumerated' specify all the possible string values that the attribute can be set to.
You can use the following commands to define the list of values.
|
Control |
Description |
|---|---|
|
Add |
Adds a new choice value item to the list. To define the value, either select the default value and click Rename, or double-click the default value, type the new value, and press Enter to accept the value. |
|
Remove |
Deletes the selected choice value. |
|
Rename |
Opens a dialog for editing the selected choice value. |
|
Dependencies |
Opens a dialog for selecting which other attributes must be present in the COS object for the choice to be available. |
|
Up, Down |
Adjusts the selected choice value's list position. You can arrange the choice values in alphabetical order by clicking the Value column header. |
Floating point
Attributes whose type is 'floating point' can store a numeric value with decimals. Optionally, the attribute type can specify the range of acceptable values.
|
Control |
Description |
|---|---|
|
Minimum value |
The minimum attribute value. |
|
Maximum value |
The maximum attribute value. |
|
Quantity type |
The quantity type. |
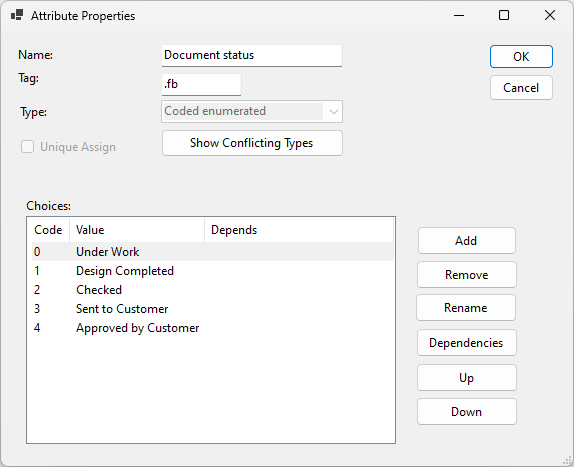
Coded enumerated
Attributes whose type is 'coded enumerated' specify all the possible values that the attribute can be set to, with an additional numeric code (0, 1, 2, …) attached to each value. This attribute type is mainly used for predefined attributes where the numeric code has some specific meaning to the software.
You can use the following commands to define the list of values.
|
Control |
Description |
|---|---|
|
Add |
Adds a new choice value item to the list. To define the value, either select the default value and click Rename, or double-click the default value, type the new value, and press Enter to accept the value. |
|
Remove |
Deletes the selected choice value. |
|
Rename |
Opens a dialog for editing the selected choice value. |
|
Dependencies |
Opens a dialog for selecting which other attributes must be present in the COS object for the choice to be available. |
|
Up, Down |
Adjusts the selected choice value's list position. You can arrange the choice values in alphabetical order by clicking the Value column header. |
Binary
Attributes whose type is 'binary' can store binary data. This attribute type is currently used only by the Content Categories feature and is not intended for any other use.
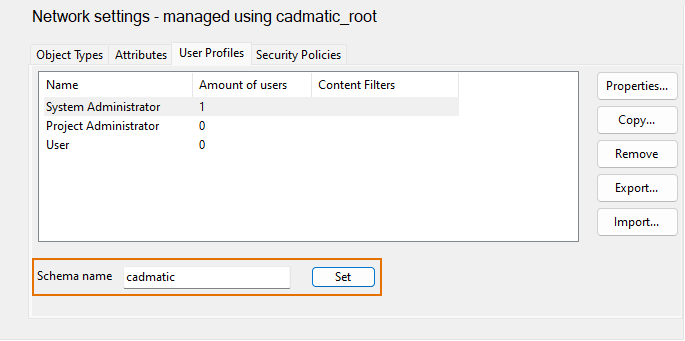
User Profiles
On the Network settings pane, select the User Profiles tab to manage user profiles. The user profile to which User Accounts are assigned determines the administrative permissions available to those accounts. Various permissions can be granted to user profiles through the Security Policies and Content Categories settings.
There is always at least one default user profile. When you create a new COS server, the server installer creates the 'System Administrator' user profile and assigns the user account of the person performing the installation to it. This default system administrator can then create additional user profiles by copying the default profile.
The CADMATIC example project has three default user profiles:
-
System Administrator
-
Project Administrator
-
User
You can use the following commands to manage the currently selected user profile.
|
Control |
Description |
|---|---|
|
Opens the User Profile Properties dialog that lists the user accounts of the selected user profile and allows managing the user profile's content category assignments. |
|
|
You can create a new user profile by selecting an existing profile, clicking Copy, and entering a name for the new profile to be created. Note: User profiles can only be changed at the root server or a subordinate server that maintains an online connection to the root server. |
|
|
Deletes the selected user profiles, without prompting you to confirm the action. You cannot delete the default user profiles. |
|
|
Opens a dialog for exporting the selected user profiles into a file. |
|
|
Opens a dialog for importing a user profile file created with the Export command. If a given user profile already exists, the import skips that profile; it does not update or replace an existing user profile. |
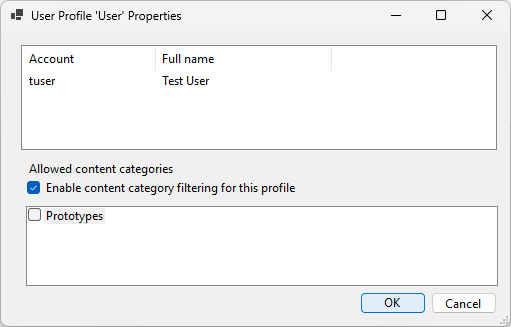
User Profile Properties
The User Profile '<profile>' Properties dialog lists the User Accounts that are assigned to the specified user profile. If the project uses Content Categories, you can specify how they affect this user profile.
|
Control |
Description |
|---|---|
|
Content category filtering controls access to items when no content categories are enabled for the user profile:
Regardless of the state of this option, items can be accessed:
|
|
|
<content category> |
Select a content category to enable it for the user profile. Important: Do not assign content categories to user profiles used by Important: Do not assign content categories to user profiles used by cabling designers, or they will not be able to access cabling tools. |
Example
In this example, COS includes two content category definitions, named 'A' and 'B'.
|
Enabled categories for profile |
Filtering enabled—accessible items |
Filtering disabled—accessible items |
|---|---|---|
|
None |
|
|
|
A |
|
|
|
B |
|
|
|
A + B |
|
|
Schema name
On the Network settings pane, the User Profiles tab displays the current name of the selected COS network. If there is a need to modify this name, enter the new name in the Schema name field, and click Set.
Security Policies
On the Network settings pane, select the Security Policies tab to manage which User Profiles are allowed to perform specific administrative actions in the selected COS network.
|
Policy |
Details |
|---|---|
|
This policy enables modification of Object Types and Attributes. |
|
|
Modify common security items: user profiles, policies, type permissions |
This policy enables defining User Profiles, Security Policies, and object type specific Security settings. |
|
Administrate servers in user's own domain: create and modify user accounts; create, remove, backup and restore databases |
This policy enables defining User Accounts and managing Databases in COS servers that share the same user accounts. |
|
Forcibly cancel checked out status and replica ownership for any object |
This policy enables forcible canceling of object check-outs and taking or requesting object ownership from replica servers. Note: This policy is required for debugging databases with the Debug command. |
|
This policy is only needed when the software has been upgraded to a newer version and the project environment needs to be upgraded to be compatible with the new software version. At other times, we recommend this policy to be disabled. Note: Upgrading of schema cannot be undone, except by restoring the old version from a backup that has been created with the old software version. |
|
|
This policy enables reading, creating, modifying, and deleting objects in library and project databases that are using access control. The users whose user profile is not assigned to this policy can only read data from the database. Access control is in use when the Policy control option is enabled in the Database properties. Note: To edit this security policy, your user profile must be included in the security policy Administrate servers in user's own domain: create and modify user accounts; create, remove, backup and restore databases. |
|
|
User is allowed to create CX exports and to read them into a project |
This policy enables CX export and import. |
|
This policy enables defining Model Filters for replication. |
|
|
This policy enables defining Content Categories for the COS network and using the |
|
|
This policy enables creating, updating, and deleting fields and sub-tables in the SQL database of P&ID. |
Content Categories
On the Network settings pane, select the Content Categories tab to define content categories for the COS network. Content categories control which User Profiles are allowed to access or modify objects that belong to a given content category group, system, or line, according to the following rules.
-
Content that is not assigned to a content category is available to all users (except where other restrictions apply).
-
Content that is assigned to one or more content categories is available to users who have all those categories selected in their user profile.
-
Content category filtering affects users with no content categories selected in their user profile:
-
if filtering is disabled, content assigned to content categories is available;
-
if filtering is enabled, content assigned to content categories is not available.
-
You can manage content categories with the following commands, provided that your user profile is included in the security policy User is allowed to manage content categories.
|
Control |
Description |
|---|---|
|
Opens the Edit Content Category dialog for creating a new content category. |
|
|
Opens the Edit Content Category dialog for editing the properties of the selected content category. |
|
|
Deletes the selected content category. You are prompted to confirm the action. Important: In the COS server, content categories are identified by content category IDs. The number of usable IDs is limited, and deleting a content category permanently reduces the total number by one. |
Edit Content Category
The Edit Content Category dialog includes the following fields.
|
Control |
Description |
|---|---|
|
The content category name. |
|
|
An optional description of the content category and its purpose. |
|
|
Click Change to select which User Profiles can access this content category. |
Server control
On the Server Tree tab or Server List tab, select a COS server to display the following server-specific settings.

Here, clicking Common configuration switches to the Network settings of the selected COS network, where you can manage object types, attributes, user profiles, and security policies. If the Server List tab is active when you make this switch, the Server Tree tab will open instead.
General | Event Log | Clients | Databases | User Accounts | Backup | Replication
General
In the Server control settings, select the General tab to view information about the selected COS server.
|
Property |
Description |
|---|---|
|
Displays the software version and build date of the COS server. |
|
|
Process ID |
Displays the process identifier of the COS server process in the server computer. |
|
Displays the server type: 'Root' or 'Replica'. The root server is the highest-level server in a COS network; it does not have a master server but may function as one. All other servers are replica servers: they replicate data upward to their master, eventually reaching the root server. In standalone installations the root server may be the only COS server that is needed, whereas in distributed environments the root server initiates a chain of servers typically located at various sites. The root server functions as a master server to its direct subordinates, and those subordinates function as a master server to their direct subordinates. |
|
|
Displays the GUID string that identifies the COS server. |
|
|
Displays the version number of the COS server's hardwired schema. |
|
|
Software protocol version displays the version number of the client application's communication protocol. Communication protocol version displays the version number of the COS server's communication protocol. A successful connection requires that the client application and the COS server are using compatible protocol versions. Protocol versions form compatibility ranges, where a major functionality change starts a new range that is incompatible with previous ranges. Normally, when the client application and the COS server are of the same software version, their protocol versions also match. However, if the client build is older or newer than the server build, the protocol versions may differ. In this case, if the protocol versions are within the same compatibility range, the connection succeeds and communication uses the protocol version of the older peer. Example: If the client's protocol version is 102, the server's protocol version is 103, and protocols 101–103 form a compatibility range, the connection succeeds and communication uses protocol version 102. |
|
|
Displays whether communication between server and clients is encrypted (On / Off). For information on enabling encryption, see Installing the root server. |
|
|
Up since |
Displays the last startup date and time of the COS server. |
|
Last backup made |
Displays the date and time of the last successful backup. |
|
Last online update with master |
For an online replica server, displays the date and time when the server last received an update from the master server. Otherwise, displays 'N/A'. See Replication. |
|
Files waiting to be uploaded |
Displays the number of files waiting to be uploaded to the COS server. |
|
The Replica tree pane lists the servers that are part of the same replication tree as the selected server, displaying the following information:
|
|
Event Log
In the Server control settings, select the Event Log tab to review recent events in the selected COS server.
For each event, you can see the date and time when the event occurred, the category of the event (I – information, W – warning, E – error), the user or system session where the event occurred, and the message related to the event. If the same user has several simultaneous sessions, they are numbered sequentially in the User(session) column, starting from zero: <user>(0), <user>(1), <user>(2), and so on.
|
Control |
Description |
|---|---|
|
Find |
Enter a search string and click Next or Prev to find its nearest occurrence in the log. |
|
Refresh |
Refreshes the list of events from the log file. |
|
Read File |
Opens a file browser for opening a different log file from the disk. |
You can use filtering to show only relevant log entries: you can filter the log by category, user, message, or time.
Clients
In the Server control settings, select the Clients tab to see which users have an open session in the selected COS server. A user can have multiple open sessions, each shown on a separate row, and the # column displays the corresponding session number, similar to the User(session) column on the Event Log tab.
|
Control |
Description |
|---|---|
|
Refresh |
Refreshes the client list. |
|
Disconnect |
Disconnects the selected client from COS. If a session has not shown any activity for a long time, it is possible that the client application has been closed but the server was not notified. This might occur, for example, when a workstation suddenly loses power. You should remove such sessions with Disconnect, as the sessions might be locking objects. |
Databases
In the Server control settings, select the Databases tab to manage the library and project databases of the selected COS server.
|
Control |
Description |
|---|---|
|
Opens the Database properties of the selected database. Also double-clicking a database opens the properties. |
|
|
Compresses the selected database to use disk space more efficiently. The program monitors wasted space and automatically performs compression when needed. For example, when a Scheduled backup has been completed, the program checks whether compression should be run. Therefore, you typically do not need to run this command manually. Usually, the automatic compression occurs at a time when users are logged out or have been inactive for a sufficient period. If certain conditions are met, the compression will start immediately. All users are locked out during compression. |
|
|
Rebuilds the selected, potentially damaged database. The program performs this task automatically if it detects that the database was not properly closed. Therefore, you typically do not need to run this command manually. |
|
|
First prompts you to confirm this action, and then attempts to delete the selected database. However, deletion may not be possible if the database is in use. |
|
|
First prompts you to confirm this action, and then opens a dialog for renaming the selected database. However, renaming may not be possible if the database is in use. Important: Contact Cadmatic Customer Support before using this command. |
|
|
Opens the selected databases in the Debug Databases dialog. You can debug a maximum of two databases simultaneously:
Note: In the CADMATIC desktop, selecting Object > Tools > Run DM Tools and then Debug Databases always opens the library and project database of the current project. |
|
|
Refreshes the database list. |
Database properties
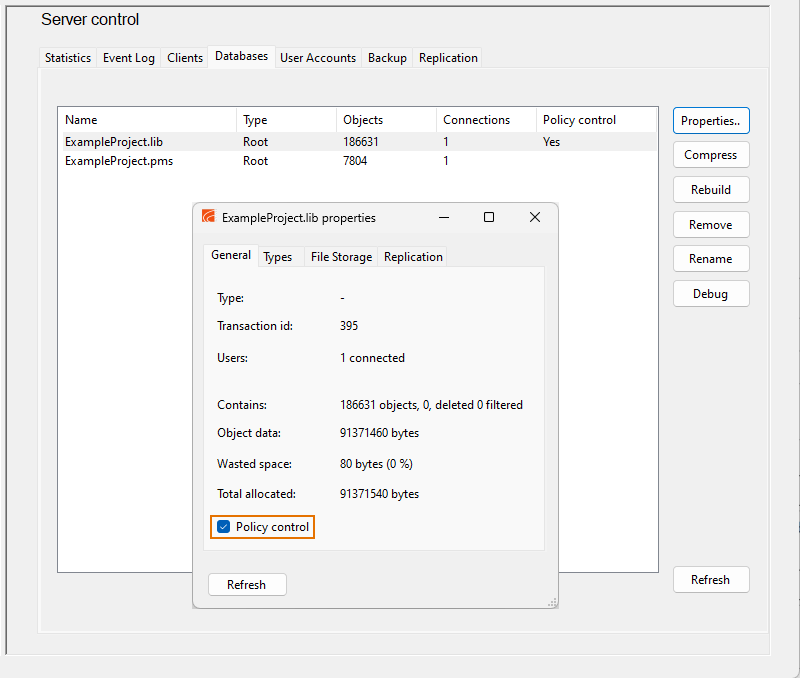
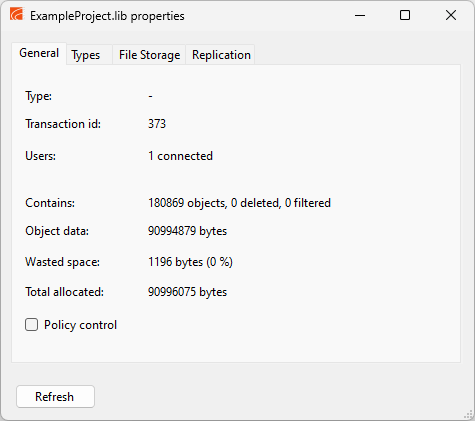
In the Server control settings, on the Databases tab, select a database and then Properties to display the properties of that database.
General
In the database properties, the General tab displays basic information about the database.
-
Object data – This field displays the number of bytes allocated to current versions of COS objects.
-
Wasted space – This field displays the number of bytes allocated to previous versions of COS objects and the percentage of wasted space from total allocation. The wasted space is removed when the database is compressed. See Compress.
-
Total allocated – This field displays the total number of bytes allocated to both object data and wasted space.
Enabling Policy control makes it possible to control modification permission via the Modify databases with access control control policy.
Types
In the database properties, the Types tab displays the object types defined in the database.
File Storage
In the database properties, the File Storage tab displays how many objects of each object type exist in the database and how much space they consume.
Replication
In the database properties, the Replication tab displays the replication status of the database.
User Accounts
In the Server control settings, select the User Accounts tab to manage the user accounts of the selected COS server. All users of design applications must have a user account in COS. This identification serves several purposes, such as:
-
Protecting access to design data. Only authenticated users can sign in and access COS databases.
-
Protecting the integrity of design data. Only a user who has checked out an object can modify and eventually check in that object. While the object is checked out, other users can see who is currently working with that object.
-
Preventing accidental editing. The execution of certain operations can be limited to a specific group of users.
-
Keeping track of changes. Creating or modifying an object stores the user name and the time of the occurrence.
-
Keeping track of errors and other system events. Events that occur during a user session are stored in the system's log, and user names are part of this information.
User accounts can be authenticated by either Windows or COS.
-
When using Windows authentication, authentication is performed by the domain controller, and the COS server does not need to know the user's password.
-
When using COS authentication, authentication is performed by the COS server, and the user's password must be specified in Manage COS Servers.
Whenever design applications need to be accessed using COS authentication, first the users need to connect to the COS server as described in Add or remove servers, to prevent automatic Windows authentication.
|
Control |
Description |
|---|---|
|
Opens the User Properties dialog for adding a new user. |
|
|
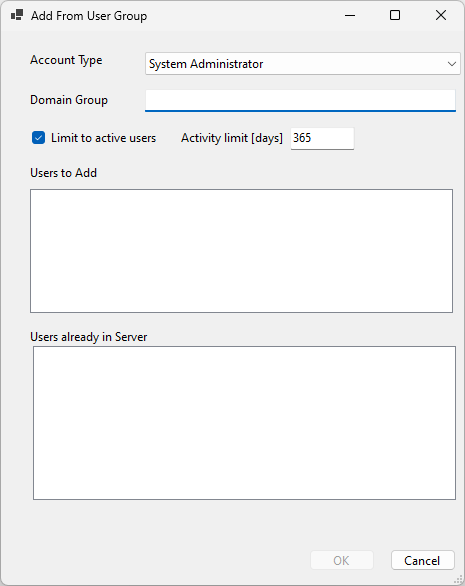
Opens the Add From User Group dialog for importing users from a domain group.
|
|
|
Opens the User Properties dialog for editing the selected user's properties—for example, if the user's Windows account name has changed, or if the user account needs to be assigned to a different user profile or deactivated. You cannot deactivate your own account. Also, if you are editing your own user account and you are the only administrator, you cannot select a non-administrative user profile. If the COS server was installed with HCA support for CADMATIC Hull, there is an automatically generated HCA COS user account that cannot be edited or removed. |
|
|
Cancels the check-outs of the selected users and removes the user accounts from the COS server. You are prompted to confirm the action. If the COS server was installed with HCA support for CADMATIC Hull, there is an automatically generated HCA COS user account that cannot be edited or removed. Important: Removing a user account also removes the ability to review the changes the user has made. Information about who created or modified a COS object is stored in the object properties, and if the user account no longer exists, the user is shown as 'Unknown'. Therefore, to prevent loss of valuable information, deactivate the user account through User Properties > Access Rights instead of removing it. |
User Properties
Starting to create or edit a user account opens the User Properties dialog.
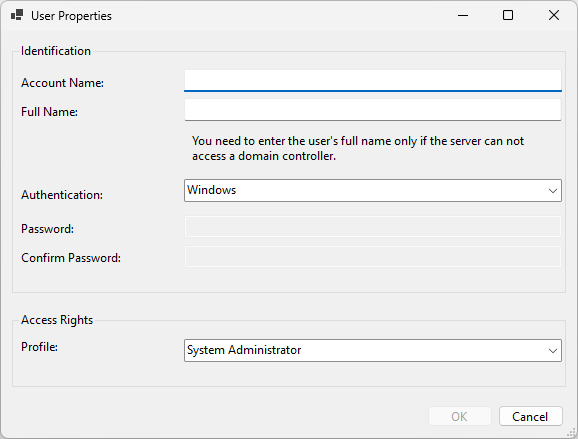
You can define the following properties for a user.
|
Property |
Description |
|---|---|
|
Specify how COS is to identify the user. |
|
|
Account Name |
Enter the account name of the new user. For Windows authentication, enter it in the format domain\user. Two COS accounts cannot use the same Windows account name. |
|
Full Name |
Enter the full name of the new user. This is the name that will be visible to other users of the applications. You can use either the 'Firstname Lastname' or 'Lastname Firstname' format, as you prefer. Tip: If using Windows authentication, leaving this field empty will retrieve the full name from the domain controller. This also serves as a confirmation that the account name has been entered correctly. |
|
Authentication |
Select whether the user should be authenticated using Windows authentication or COS authentication. For COS authentication, you must specify and confirm the password for this account. |
|
Specify the access rights of the user account by assigning it into one of the User Profiles. |
|
|
Profile |
Select a user profile for the user. |
|
Is deactivated |
Select this option to prevent the user from accessing COS databases. This does not take effect immediately for a currently active user session but prevents new sessions from being established. |
Backup
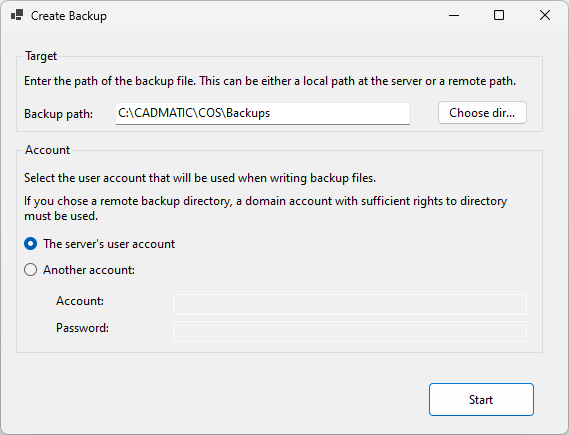
In the Server control settings, select the Backup tab to manage the creation of backups for the selected COS server.
A COS backup (.bup) file, which is technically a zip archive, stores the state of a specific COS server at a given moment. COS backups should be created regularly so that servers can be restored if needed. (In contrast, Archiving is a one-time operation intended for the long-term storage of project data.)
COS backups may contain, for example, the following data:
-
The global server configuration, including the database schema.
-
The library and project databases, including the historical information of the model objects.
-
The local server configuration.
-
The local document files.
-
The SQL database backup (.bak) of P&ID.
COS backups do not contain any data stored in users' workspaces, as the COS server does not know the whereabouts of this data.
COS backups are server-specific. The size of the backup may vary significantly depending on whether it is created on a master or a replica server, and there are two main reasons for this.
-
First, size differences are typically caused by document files, because they are automatically replicated from the replica servers to the master server, but only upon request from the master to a given replica. The impact of document files on backup size can be observed by creating backups with and without them on both the master and the replica server.
-
Second, the use of replication filtering may limit a replica server's access to model objects.
As a result, a replica server that includes fewer document files than its master and/or has limited access to model objects will produce smaller backup files than the master server.
Typically, COS backups are scheduled to occur automatically, but you can also start the backup process immediately if needed.
-
Scheduled backups are named in the format <serverName>_<yyymmdd>.bup, and document files may either be included in the same file or distributed to separate .bup files.
-
Immediate backups can be set to exclude document files.
You can verify that scheduled backups are being created according to the schedule by monitoring the target folder, the COS server's Event Log, or the operating system's Event Log.
|
Control |
Description |
|---|---|
|
Target Specify where and how to create the backup files. |
|
|
Specify the path to the folder where the backup files will be created. The path can point to either a local folder on the server computer or a remote folder on another computer. When using a remote folder, define the path as a UNC path. The backup process creates temporary files on the local disk and removes them when they are no longer needed. Important:
|
|
|
Select this option to first create the entire backup locally. The backup file or files are then automatically copied to the remote location and removed from the local folder after the copying is complete. Using this method requires additional disk space on the local drive, but the backup process is more tolerant of connection issues that may occur when writing to the remote folder. |
|
|
Select how to back up document files:
|
|
|
Specify the user account the backup process will use for writing to the target folder. |
|
|
The server's user account |
Select this option to use the COS server's user account for creating the backups. This is the user account that you used to Connect to the server. Note: If the backup path points to a remote folder, this must be a domain account that has the required privileges on the target computer. |
|
Another account |
Select this option to use a specified user account for backups, for example, when the backup files are saved to a remote computer. Note: If the backup path points to a remote folder, this must be a domain account that has the required privileges on the target computer. |
|
Specify a schedule for automatic backups. |
|
|
Start backup daily |
Select this option to back up the data of the selected COS server every day. Enter the daily start time in the format hh:mm. |
|
Delete backups older than |
Select this option to automatically delete scheduled backups after a specified number of days. |
|
You can create a backup immediately. |
|
|
Backup now |
Opens the Create Backup dialog for making a COS backup immediately. This can be useful for backing up data just before a maintenance operation, or for backing up a stand-alone installation on a laptop computer that is powered off when not being used.
|
Replication
A globally distributed project can encompass multiple sites, where a 'site' is a geographical location like a design office, construction site, or shipyard that houses a number of CADMATIC users connected to a local area network, sharing resources within that network. However, they cannot readily access resources located at the other sites. Moreover, users who utilize a laptop computer and do not consistently work at the office need to have their own designated site.
The CoDesigner functionality allows for intelligent distribution of design work using replication of COS databases and document files, as well as managing of project data ownership. Each site installs a COS server equipped with CoDesigner. These servers provide database and file replication services for CADMATIC applications.
The sites and their servers interconnect in a star-like or tree-like structure. One specific site centrally manages the project, known as the 'main site'. The main site is the project's first site and is implicitly initiated when the project is created on the root server.
Other sites, such as subsidiary offices and subcontractors, known as 'satellite sites', host replica servers. They connect to either the main site or other satellite sites. Data exchange between sites can occur in two ways: through direct communication or manual file transfer.
In the Server control settings, select the Replication tab to manage the replication settings of the selected COS server.
-
If the COS network lacks replica servers, all settings are disabled.
-
If the selected server is a root server, you can manage its replica servers.
-
If the selected server is a replica server, you can manage its communication with its master server.
|
Control |
Description |
|---|---|
|
These settings specify how the selected replica server exchanges data with its master server. |
|
|
Select this option to enable the replica server to regularly exchange updates with the master server and other servers linked to the master. Clicking Set applies the setting and performs an update. If not selected, the replica server is to exchange updates with the master server by using manual file transfer. |
|
|
Select this option to specify that the replica server is to exchange updates with the master server by using sequential file transfer. If not selected, the updating occurs simultaneously at both sites in direct mode. This requires a stable online connection. For more details, see Online replication modes. |
|
|
Enter the address of the master server using the hostname (or IP address) and port, separated by a colon. Example: MyMaster:5020 |
|
|
Enter the public address of the replica server using the hostname (or IP address) and port, separated by a colon. The only use for this setting is to enable the master server to connect to the replica server while performing a Request ownership from replica operation. Example: MyReplica:5021 |
|
|
Select this option to enable the replica server to automatically exchange updates at the specified interval. Note: The COS server's workload may cause the time between two consecutive replication events to exceed the specified interval value. |
|
|
Select this option to set the replication functionality as follows:
These rules apply not only to COS objects but also to associated files, such as documents. Note: On the master server, this option can be enabled or disabled from the Properties of the replica server. |
|
|
Enable replica running newer SW version from root |
(This option is not available.) |
|
On a replica server that is online, this command exchanges new and changed data with the master server. On a replica server that is offline, this command opens a file browser for saving new and changed data to an Update_from_<replica>.upd file on the disk. This update file should then be sent to the master server and opened there with the From Replica command. |
|
|
On a replica server that is online, this command sends all the data from the replica server to the master server. The master server then compares its existing data with the data received from the replica, selecting the most recent version of each object to update the master data. On a replica server that is offline, this command opens a file browser for saving all the data to an Update_from_<replica>.upd file on the disk. This update file should then be sent to the master server and opened there with the From Replica command. Note: Rebuilding the database may take a considerable amount of time, and during this period, all other operations may be slower on both the master and the replica. |
|
|
On a replica server that is offline, this command opens a file browser for selecting the Update_to_<replica>.upd file sent from the master server. |
|
|
On a master server, this command opens a file browser for selecting the Update_from_<replica>.upd file sent from an offline replica, reads the data from the file, and opens a file browser for saving an Update_to_<replica>.upd file. This update file should then be sent to the replica server and opened there with the From Master command, to complete the update cycle. |
|
|
On a master server, lists the replica servers of the master server. |
|
|
Select whether to enforce a specific replication mode for all replica servers.
|
|
|
Removes the selected replica server. |
|
|
Allows creating a new replica server for the selected server, as described in Creating replica server installation (.cri) files. |
|
|
Opens the Replica Properties dialog which shows information about the selected replica server. General Select this option to try to force the replica server into read-only mode. This requires that the replica server is using online replication. If the replica server is using offline replication and there is an attempt to update the master server with an update file received from the replica server, an error message indicates that the update cannot be performed. If the replica server manages its own user accounts, here you can designate which ones are allowed on this server. Click Apply to apply the changes. (This is future functionality.) |
|

Multi server control
On the Server List tab, select two or more COS servers to display the following settings.
|
Control |
Description |
|---|---|
|
Replicate chain Use these commands to initiate replication of data on the selected COS servers. |
|
|
Bottom Up |
This command initiates the replication process on the selected servers, starting from the bottom-most server and moving upward in the server hierarchy. |
|
Top Down |
This command initiates the replication process on the selected servers, starting from the top-most server and moving downward in the server hierarchy. |
|
Replication Settings Use these commands to set the selected COS servers online or offline. For more information, see Replication. |
|
|
Set online |
This command sets the selected servers online, enabling them to replicate data via an online connection. |
|
Set offline |
This command sets the selected servers offline. Replication must be performed using manual file transfer. |
|
Backup Settings Use these settings to specify where and when to back up the data of the selected COS servers. |
|
|
Target Specify where to store the backup files. |
|
|
Backup path |
Specify the path to the folder where the backup files will be created. The path can point to either a local folder on the server computer or a remote folder on another computer. When using a remote folder, define the path as a UNC path. The backup process creates temporary files on the local disk and removes them when they are no longer needed. Important:
|
|
Account Specify the user account the backup process will use for writing to the target folder. |
|
|
The server's user account |
Select this option to use the COS server's user account for creating the backups. This is the user account that you used to Connect to the server. Note: If the backup path points to a remote folder, this must be a domain account that has the required privileges on the target computer. |
|
Another account |
Select this option to use a specified user account for backups, for example, when the backup files are saved to a remote computer. Note: If the backup path points to a remote folder, this must be a domain account that has the required privileges on the target computer. |
|
Scheduled backup Specify a schedule for automatic backups. |
|
|
Start backup daily |
Select this option to back up the data of the selected COS servers every day. Enter the start time in the format hh:mm. |
|
Schedule backups with intervals of |
Select this option to perform the backups so that each additional backup starts a specified number of minutes after the previous one. Enter the interval in minutes. |
|
Delete backups older than |
Select this option to automatically delete the daily backup after a specified number of days. |
Note: If you want to create a server backup immediately, select a single server and navigate to the Backup tab.